Lesson 29: Separate Concerns
Two broad strategies can be used when building a Reagent application. The first is to keep all state in a single atom, which is the approach that we used in the last lesson. The second is to keep different pieces of state separate and to use asynchronous communication between them. The first approach is simpler and easier to reason about, but the second is useful in creating large UIs that may be developed by multiple teams. It lends itself to the idea of micro-frontends, in which different teams maintain different components that are tied to separate business initiatives or functional areas, and these components can interact with other teams’ components via messaging. Since we have already had a look at the first approach, this lesson will cover the basics of the second approach.
In this lesson:
- Create decoupled components
- Explore different messaging patterns for communicating within a UI
- Moving business logic into a frontend API
Connecting Components With Channels
ClojureScript provides us with all of the mechanisms that we need for quick and simple messaging in core.async, so we will take advantage of that. There are two cases in which we may want to use component-local state and messaging instead of shared state and reactive programming: creating modular components that can be re-used and integrated across multiple applications, and providing components that serve an auxiliary - even service-like - function, such as notifications, tours/onboarding widgets, and progress bars. In this lesson, we’ll implement a notification component that manages its state but uses core.async channels to communicate.
First, we will use a similar message bus pattern to what we used in Lesson 26 to enable components to be able to publish and subscribe to a single common message bus:
(ns learn-cljs.notifications
    (:require [cljs.core.async :refer [go-loop pub sub chan <! put!]]))

(defonce msg-ch (chan 1))
(defonce msg-bus (pub msg-ch ::type))

(defn dispatch!
 ([type] (dispatch! type nil))
 ([type payload]
  (put! msg-ch {::type type
                ::payload payload})))
NOTE: Namespaced Keywords
Standard ClojureScript keywords start with a single colon followed by one or more characters that are valid in an identifier, e.g.
:i-am-a-keyword. However, keywords may also contain a namespace to distinguish them from other keywords that may have the same name. For example,:genre/rockand:terrain/rockhave the same name -"rock"- but different namespaces. There are two ways to create a namespaced keyword: by prefixing the keyword name with the namespace followed by a forward slash or starting the keyword with a double-colon. The double-colon version uses the current ClojureScript namespace as the keyword namespace, so a keyword that is referenced as::typewithin a namespace calledlearn-cljs.notifications.pubsubcould also be referenced as:learn-cljs.notifications.pubsub/type. Namespaced keywords are especially common in larger projects with multiple contributors.
Unlike the message bus that we used in Lesson 26, we hard-code the dispatch! function to emit to the msg-ch channel. Similarly, our components will rely on the msg-bus being in scope. Now we can write our notification component:
(def initial-state
  {:messages []
   :next-id 0})

(defn add-notification [state id text]
  (-> state
      (update :messages conj {:id id
                              :text text})
      (assoc :next-id (inc id))))

(defn remove-notification [state id]
  (update state :messages
    (fn [messages]
      (filterv #(not= id (:id %)) messages))))             ;; <1>

(defn notifications []
  (let [state (r/atom initial-state)]                      ;; <2>
    (listen-for-added! state)                              ;; <3>
    (fn []
      [:div.messages
        (for [msg (:messages @state)                       ;; <4>
              :let [{:keys [id text]} msg]]
          ^{:key id}
          [:div.notification.is-info
            [:button.delete {:on-click #(swap! state remove-notification id)}]
            [:div.body text]])])))
filtervacts just likefilter, but it returns a vector- load the initial state into a reactive atom at component set-up
- we will implement this function next
- dereferencing this atom causes the component to be reactive
The state for this component is quite simple: a collection of messages and an incrementing counter to keep track of the next id. We also have a pair of functions for adding and removing a message from state. Next, we’ll define the listen-for-added! function that will subscribe this component to ::add-notification messages:
(defn listen-for-added! [state]
  (let [added (chan)]
    (sub msg-bus ::add-notification added)
    (go-loop []
      (let [text (::payload (<! added))
            id (:next-id @state)]
        (swap! state add-notification id text)
        (js/setTimeout #(swap! state remove-notification id) 10000)
        (recur)))))
The go-loop created by this function will consume messages from the ::add-notification topic and add them to the messages vector using the add-notification function that we already defined. It will also set a timer to remove the message after 10000 milliseconds.
Note that although we will consume messages from a message bus to add notifications to the component’s state, the render function of this component is agnostic to how that data gets into its state. It would be trivial to take this notification component and plug it into an application that manages its entire state in a single atom. The render function would remain untouched, and we would only need to modify the command handler functions and the component setup function.
Now that we have a pluggable notification component, we can hook up another component to publish notifications. For the sake of example, we will create a simple form that accepts a user’s first and last name and then emits a greeting when the form is submitted.
(defonce form-state (r/atom {:first-name ""                ;; <1>
                             :last-name ""}))

(defn update-value [e field]                               ;; <2>
  (swap! form-state assoc field (.. e -target -value)))

(defn submit-form []                                       ;; <3>
  (let [{:keys [first-name last-name]} @form-state]
    (dispatch! ::add-notification
      (str "Welcome, " first-name " " last-name)))
  (swap! form-state assoc :first-name ""
                          :last-name ""))

(defn input-field [key label]                              ;; <4>
  [:div.field
    [:label.label label
    [:div.control
      [:input.input {:value (get @form-state key)
                     :on-change #(update-value % key)}]]]])

(defn input-form []
  [:div.form
    [input-field :first-name "First Name"]                 ;; <5>
    [input-field :last-name "Last Name"]
    [:div.field
      [:button.button {:on-click submit-form}
        "Add"]]])
- Reactive atom for managing form state
- Event handler for input fields
- Event handler for submit button click
- Input field component
- Arguments are passed as the elements immediately after the component function
After the previous lesson, this should look like a pretty standard Reagent component. We create a reactive atom to hold the state of the form, and we create components for inputs and a submit button. The interesting piece about this code is that the submit-form function is decoupled from the notification component. The downside of creating decoupled components like this is that it is more difficult to trace the result of some action through the code to know exactly what the outcome will be. The outcome depends on what (if anything) is subscribed to the ::add-notification topic.
You Try It
Try factoring out this example into separate namespaces for the input form, the notifications component, and the messaging layer. Remember that prefixing a keyword with a double-colon gives it a namespace with the same name as the namespace it appears in.
Message Patterns
There are many different ways to structure asynchronous messaging that achieve the goal of decoupling components from each other and from coordination logic, so we will turn to examine several of the broad categories of messaging: direct pubsub, command/event, and actors. Each one of these approaches takes a different approach to the trade-off between simplicity and modularity.
Direct Publish/Subscribe
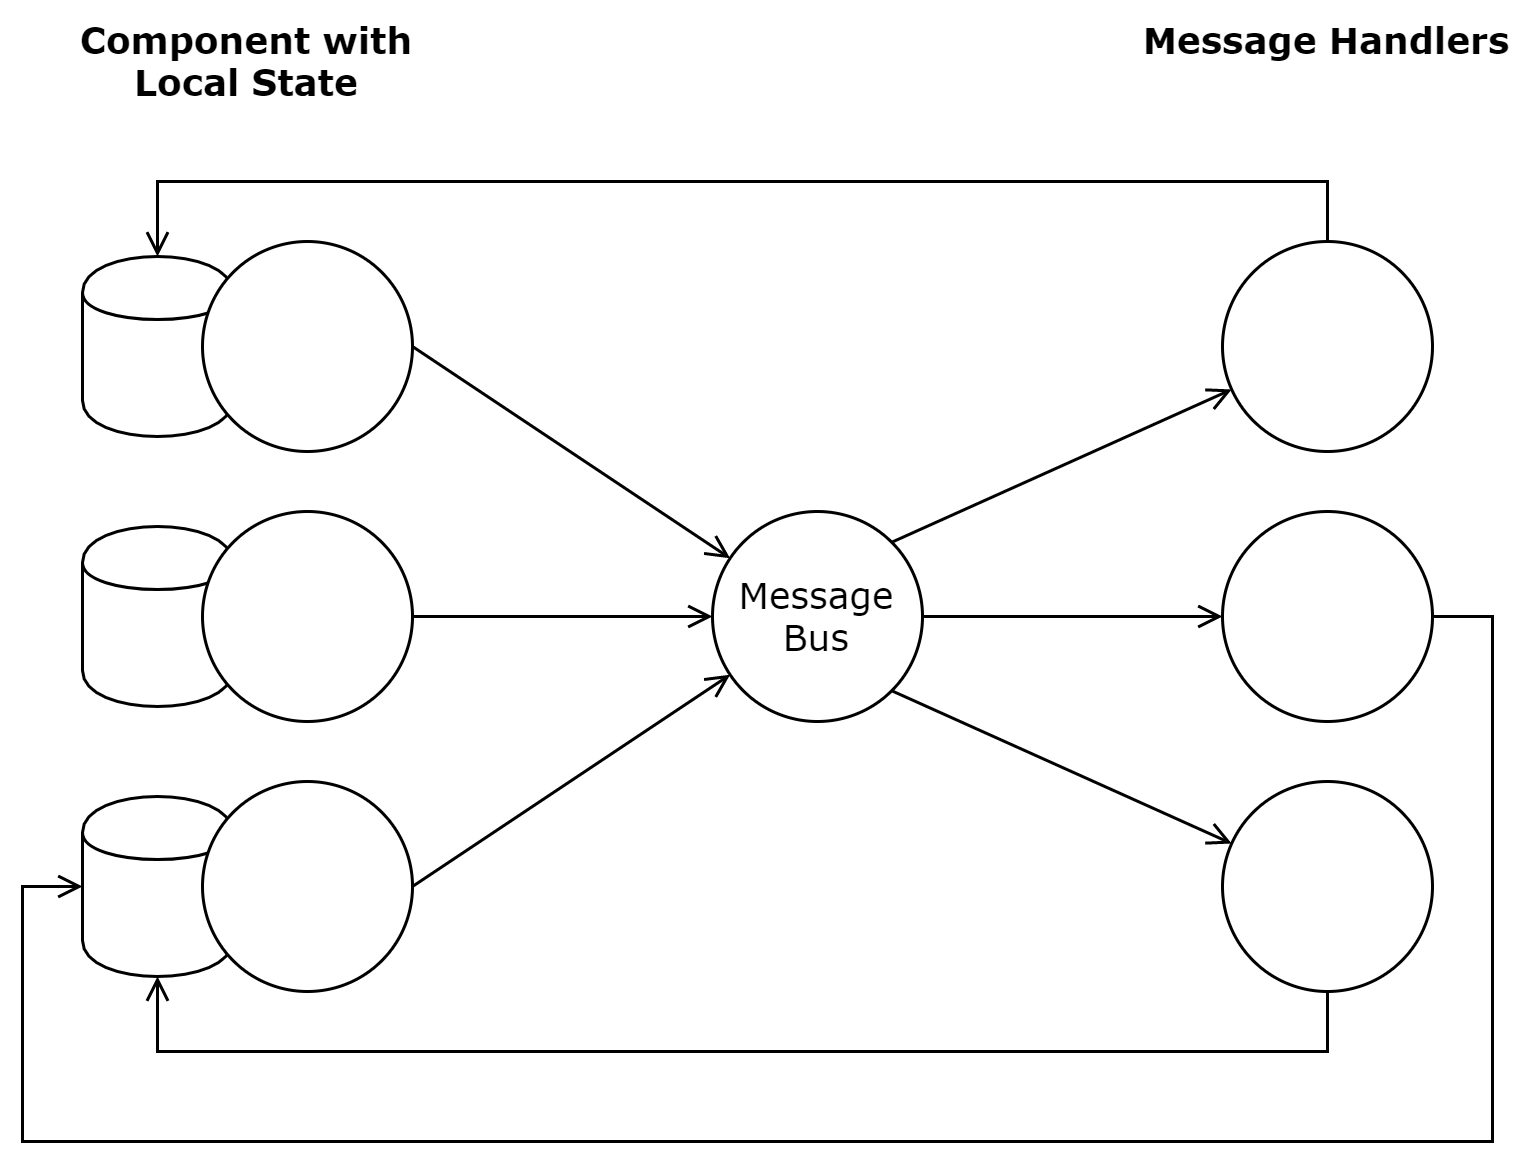
The direct publish/subscribe (or pubsub) pattern is the one that we used in the example above: there is a message bus that accepts messages from a single channel and broadcasts them to any subscriber channels that are registered to that topic. With this approach, we maximize flexibility such that any component can publish a message, and any component can listen. This pattern replaces direct function calls with message dispatch.

Direct Pubsub Messaging
This flexibility is also the downside of this pattern. Function calls are highly constrained, and we can easily trace execution from one function to another. When we think about the pure substitution model of execution that we have discussed several times, a program looks like one large function. Asynchronous messaging breaks this paradigm such that we have to think of our program as multiple programs that can all observe the actions of others and react accordingly. While the complexity of direct pubsub is easy enough to manage in small applications, we often need a pattern that imposes a few constraints, which brings us to the Command/Event pattern.
Command/Event
In the notification component example, the form dispatched an ::add-notification message. If there were some other action that needed to take place (such as submitting the form to an API), then we would be faced with the awkward choice of whether to have our API handler listen for this specific ::add-notification message or make the form submission handler aware of the new action that needs to be performed. Since the goal of messaging is to decouple components from one another and to separate presentation logic from business logic, we would prefer to keep our components agnostic of the actions that they need to trigger. One way to achieve this is with the Command/Event pattern.
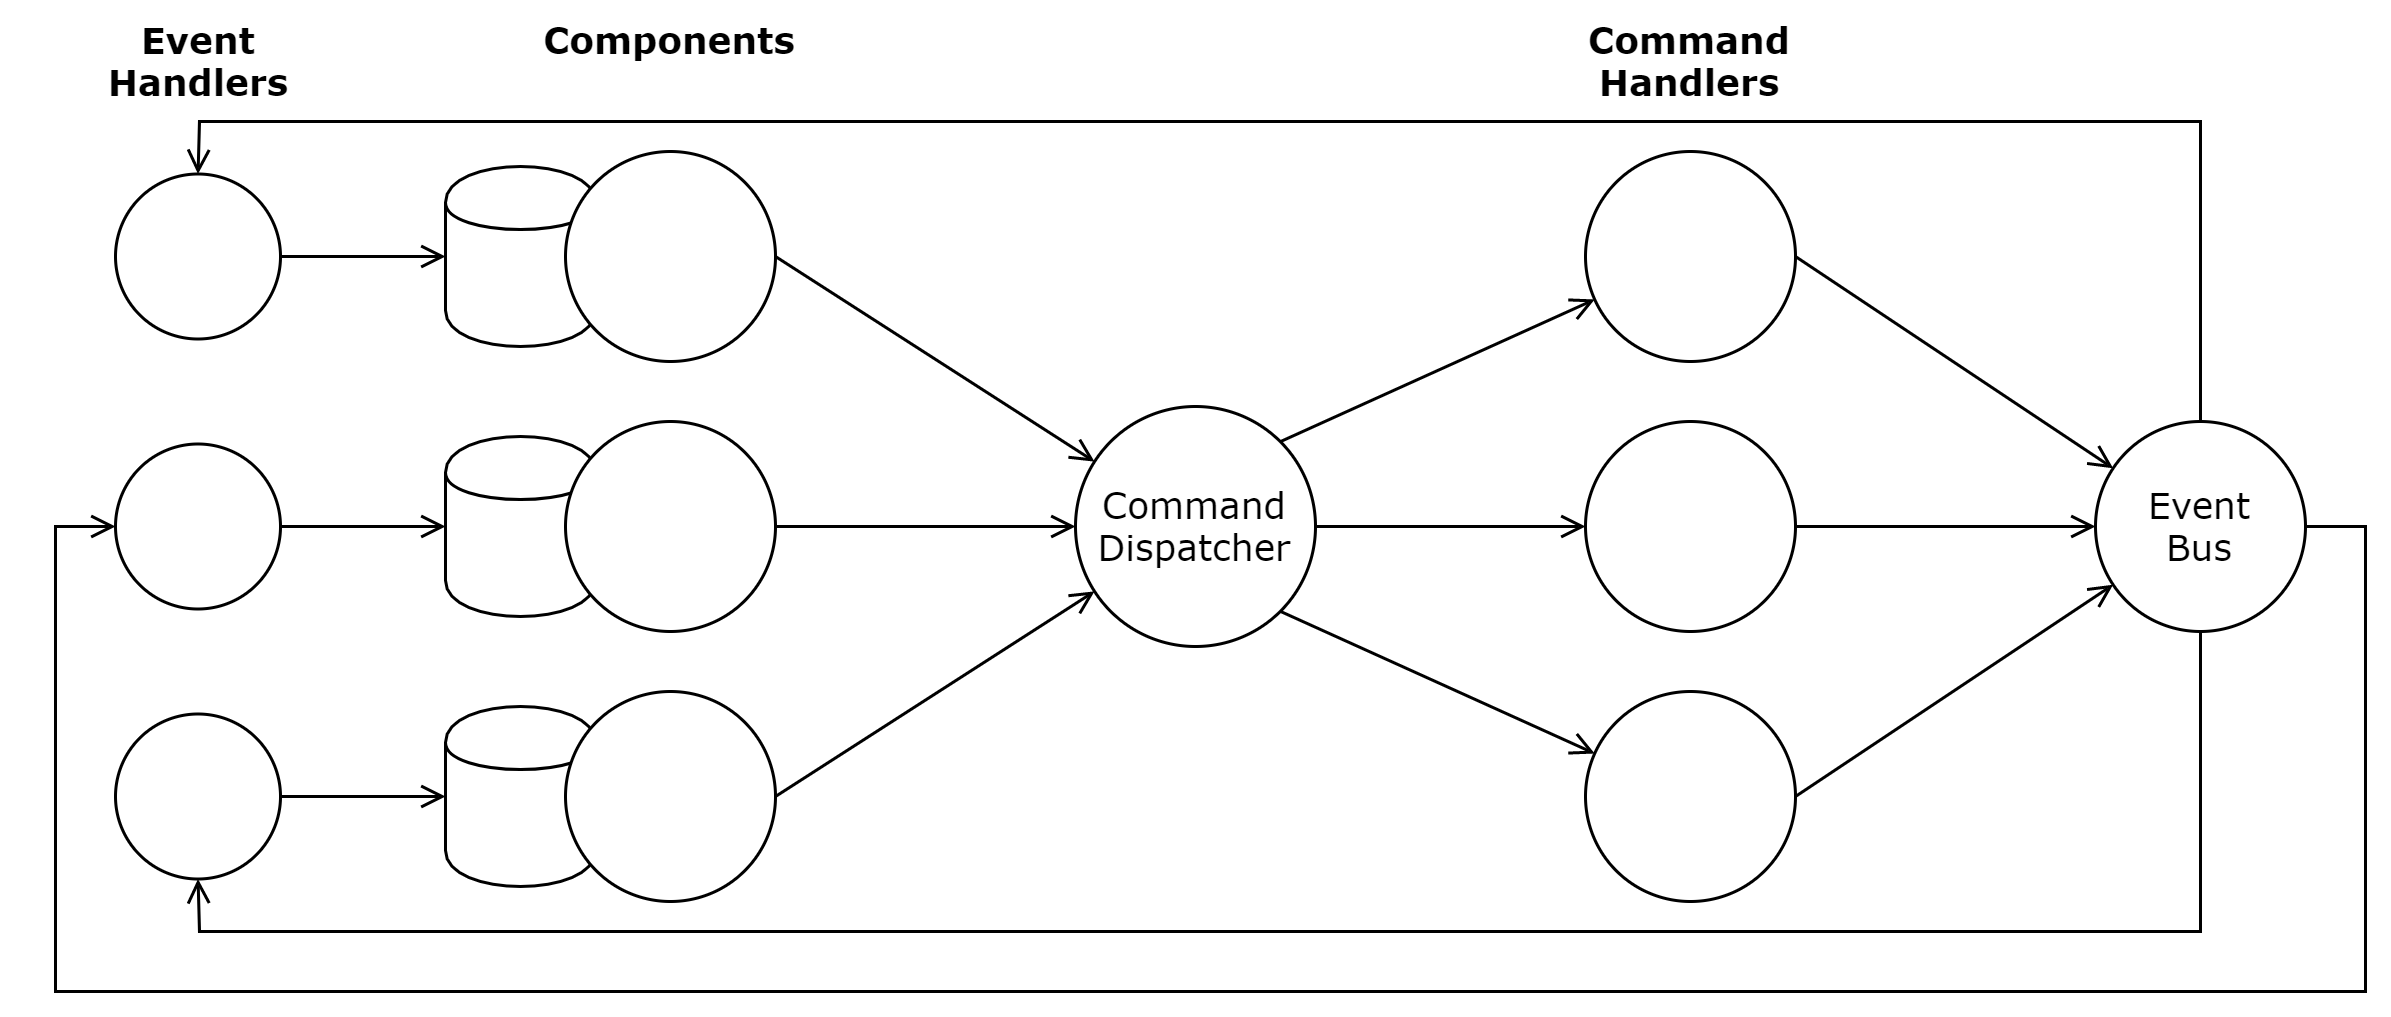
With this pattern, our components will dispatch commands, but another layer will be responsible for handling each command and emitting zero or more events that other systems may react to. For the notification example, we could replace the dispatch! function with one that explicitly delegates each type of command to a dedicated handler.

Command/Event Messaging
(defonce evt-ch (chan 1))
(defonce evt-bus (pub evt-ch ::type))

(defn emit!
 ([type] (emit! type nil))
 ([type payload]
  (put! evt-ch {::type type
                ::payload payload})))

;; ... Other handlers

(defn handle-user-form-submit! [form-data]
  (let [{:keys [first-name last-name]} form-data]
    ;; ... emit other events
    (emit! :notification/added (str "Welcome, " first-name " " last-name))))

(defn dispatch! [command payload]
 (case command
   ;; ... handle other commands
   :user-form/submit! (handle-user-form-submit! payload)))
Our new dispatch! function is a normal, synchronous function that will delegate handling of each specific command to a specialized handler function. Here, the :user-form/submit! command is handled by handle-user-form-submit!. In a real application, this handler would likely do other things like make API calls or emit additional events, but we will keep it simple and only emit an event for the notifications component to display.
Although we have replaced the pubsub pattern for commands with a direct function dispatch, we have kept it for events. In fact, evt-ch, evt-bus, and emit! are just renamed versions of msg-ch, msg-ch, and dispatch! from the pubsub version, except that their purpose is to convey event messages only and not commands. The only piece of the UI that needs to change in this version is that the notification component should subscribe to the :notification/added topic on evt-bus:
(defn listen-for-added! [state]
  (let [added (chan)]
    (sub evt-bus :notification/added added)
    ;; ...
  ))
The trade-off that we must make when using the command/event pattern over direct publish/subscribe is boilerplate code. Instead of embedding all message handling logic inside our components, we must now maintain a command handler layer. The advantage is that when we need to modify the messages that are sent or received in our application, there is a single place that we need to modify, whereas there is not a bound to how many subscribers may need to be identified and modified.
Actor System
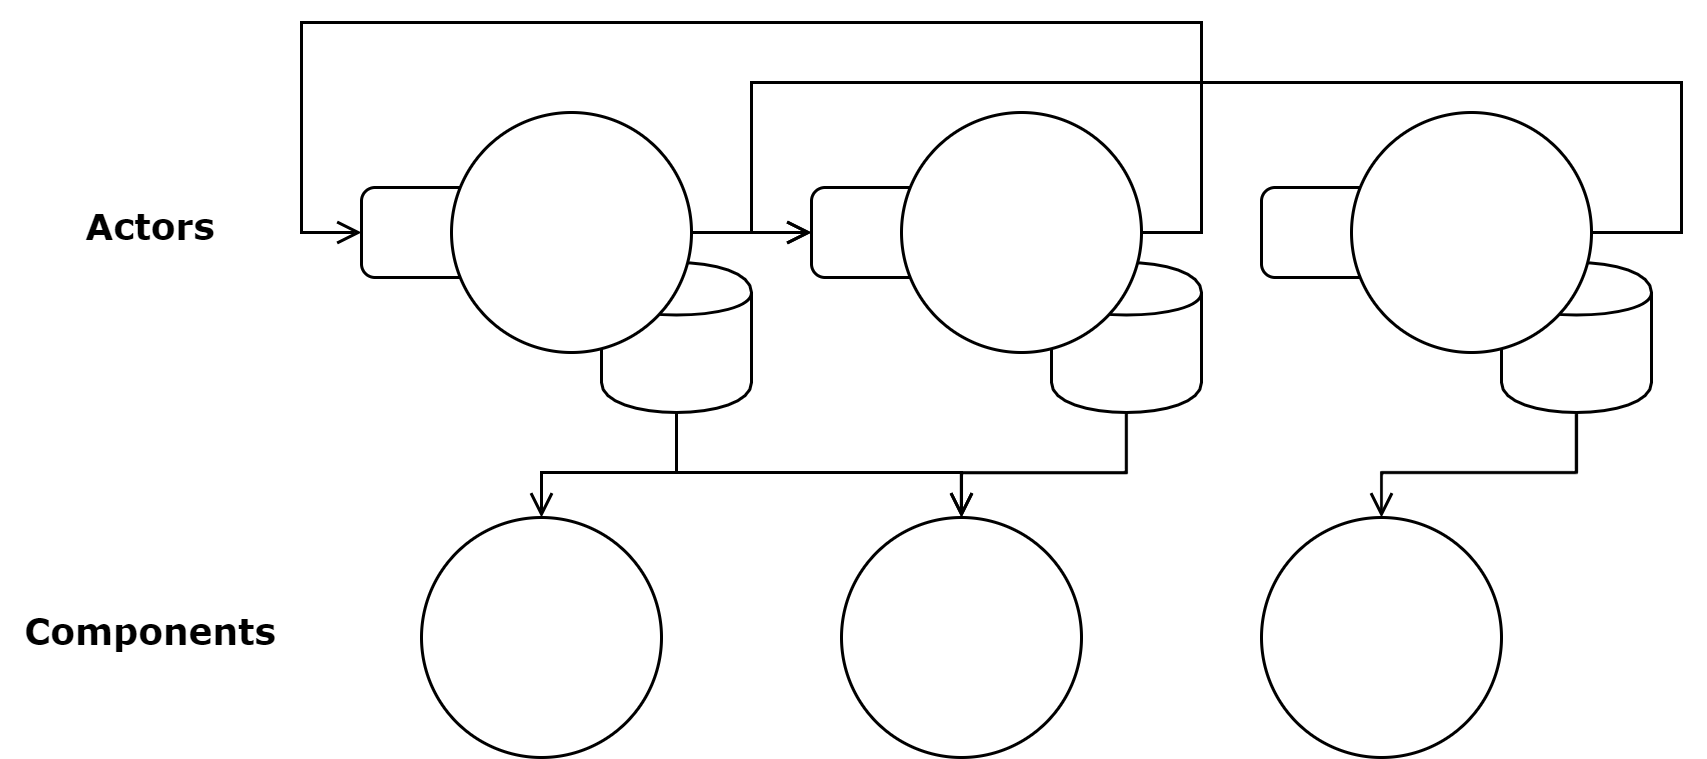
Before we wrap up, it is worth looking at one more messaging pattern that is borrowed from Erlang/Elixir and the Akka framework: actors. Actors are conceptual entities that have a mailbox where they can receive messages to act on at some point. Actors can send messages to other actors’ mailboxes as well, and they can be created and destroyed programmatically. Unlike Erlang and Elixir, Clojure does not have native support for actors, but they can be trivially emulated using the CSP model of concurrency provided by core.async. For example, we can create a simple system of actors using only a few functions.
(defn actor-system []                                      ;; <1>
  (atom {}))

(defn send-to! [system to msg]
  (when-let [ch (get @system to)]
    (put! ch msg)))

(defn actor [system address init-state & {:as handlers}]
  (let [state (r/atom init-state)                          ;; <2>
        in-ch (chan)]
    (swap! system assoc address in-ch)                     ;; <3>
    (go-loop []
      (let [[type & payload] (<! in-ch)]
        (when-let [handler (get handlers type)]
          (apply handler state payload))                   ;; <4>
        (recur)))
    state))
A Basic Actor System
- We represent an actor system as a mutable map of addresses to channels
- Each actor holds state in a reactive atom
- Register the actor with the system
- Dispatch to a specific handler based on the message type
With this actor system, we can create actors that manage each distinct piece of the application state. With this simple implementation, we can create a single actor system using the actor-system function then declare any number of actors using the actor function. Unlike most actor implementations, our actor function will return the reactive atom representing the actor’s state, which we can then dereference in our Reagent components. The actor itself will live as a go loop that will continually read messages from its mailbox and dispatch them to the handler functions that we declare. Let’s see how to apply this to the notification example.
(defonce sys (actor-system))                               ;; <1>

;; ...                                                     ;; <2>

(defonce notification-state
  (actor sys 'notifications                                ;; <3>
    {:messages []
     :next-id 0}

    :add-notification
    (fn [state text]
      (let [id (:next-id @state)]
        (swap! state add-notification id text)
        (js/setTimeout
          #(send-to! sys 'notifications
             [:remove-notification id])
          10000)))

    :remove-notification
    (fn [state id]
      (swap! state remove-notification id))))

(defonce form-state
  (actor sys 'input-form
    {:first-name ""
     :last-name ""}

    :update
    (fn [state field value]
      (swap! state assoc field value))

    :submit
    (fn [state]
      (let [{:keys [first-name last-name]} @state]
        (send-to! sys 'notifications
          [:add-notification (str "Welcome, " first-name " " last-name)]))
      (swap! state assoc
        :first-name ""
        :last-name ""))))

(defn notifications []
  [:div.messages
    (for [msg (:messages @notification-state)              ;; <4>
          :let [{:keys [id text]} msg]]
      ^{:key id}
      [:div.notification.is-info
        [:button.delete
          {:on-click #(send-to! sys 'notifications         ;; <5>
                        [:remove-notification id])}]
        [:div.body text]])])

;; ...                                                     ;; <6>
Using Our Actor System
- Declare a single actor system
add-notificationandremove-notificationare unchanged- Declare an actor with the symbol
'notificationsas its address notification-stateis just a reactive atom that we can dereference- Updating state is now done by sending a message to an actor
- The remaining components are omitted because they do not demonstrate any new concepts

Actor System Messaging
One clear advantage of this pattern is that we can declare the state right next to all of the functions that may update it, which makes tracing business logic trivial. For state that is only going to be used by a single component, this pattern does not offer a significant advantage over creating an atom when setting up the component, but for shared state, this pattern can simplify how we manage state.
Quick Review
- In the Command/Event pattern, where should side effects (like API calls) be performed?
- Which messaging pattern is the simplest for small applications?
- Is the Actor pattern more appropriate for state that is accessed by a single component or many components?
Client/Server Architecture
When we start to decouple our view components from the business logic of updating state, we can start to think of state management as an API that lives on the client. This way of programming gives us a clear boundary for separating presentation and business logic concerns, and it leads to much more maintainable code. Additionally, if we factor our state management from our UI, then we can also deal with getting data to and from a backend API layer outside our components. This additional level of separation gives us much more flexibility since we are free to vary how the backend API and components work independently. For instance, if we need to re-shape the data that comes from a back-end before rendering it, that can be done in our frontend API layer.
This front-end API looks slightly different in each of the messaging patterns. In the direct pubsub pattern, the message handlers provide this API layer, although there is no distinction between messages that originate in the UI from those that originate from a back-end API, so this pattern can lead to spaghetti code in larger codebases. In the command/event pattern, the same command handler will generally handle a command originating in the UI and control and back-end API calls that need to be made within a single function, so the logic is more centralized. Finally, in the actor pattern, we can create a dedicated actor whose responsibility is running back-end API requests - and perhaps keeping track of things like what requests are in progress or have failed in order to display loading/error indicators in the UI. In any case, using messaging to decouple components from each other and core business logic makes our code more flexible at the cost of added complexity.
Summary
In this lesson, we considered the example of a notification component to discuss the need for communication between components. In previous lessons, we had looked at using a single reactive atom and allowing communication via shared access to that single atom. In this lesson, we looked at an alternative way of communication using messaging. We considered three patterns - direct pubsub, command/event, and actor systems - which each serve to provide constraints around how components can communicate with each other as well as with backend APIs. Finally, we considered how messaging allows us to treat our business logic as a front-end API and how decoupling state management from presentation leads to more flexible code.